Using Raycast to post to Kirby and Mastodon
In this guide, we will develop a Raycast plugin that allows us to create a note that will be published not only on our page, but also on Mastodon and/or Bluesky.
With just one shortcut, we will always have access to the form in Raycast. It will be sufficient to enter text and send it to create a note or bookmark in Kirby-CMS, and distribute them from Kirby to other platforms (POSSE).
POSSE
POSSE is not a funny performance in this case, but stands for: Publish (on your) Own Site, Syndicate Elsewhere. It’s about always publishing first on your own site and distributing from there.
On the Mac, we will use Raycast. Raycast allows us to quickly execute commands, assign these commands shortcuts, and a alias.
I want to use the keyboard shortcut SUPER+N on my Mac to open this window and create a new note:
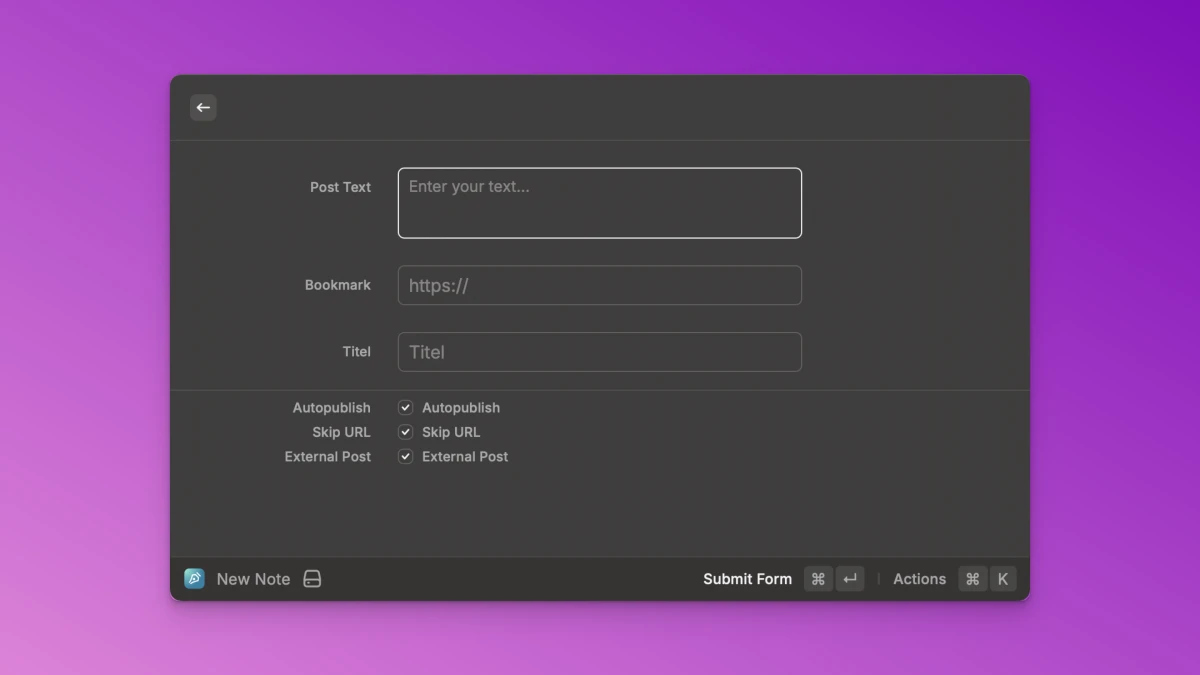
Here, I can enter a short text when I would like to create a bookmark, a URL, an optional page title, and finally, I can also set whether the post should be published immediately, whether it should also be posted to Mastodon, and whether a URL should be attached to the post at Mastodon.
What do we need?
- A Kirby Route plugin that provides a route to create a new note
- A Raycast Plugin that allows for quick input and calls the Kirby route
- The IndieConnector plugin, which handles the POSSE part.
Basics
On my website, I distinguish between two types of notes:
- Simple text notes
- Bookmarks
Both use different templates and behave differently on the page.
To automatically post to Mastodon, I use the IndieConnector plugin. The installation is done in our example via Composer. In the main directory of Kirby, you run:
composer require mauricerenck/indieconnector
This installs the IndieConnector plugin, so we can now configure it. To accomplish this, we go to the file sites/config/config.php and make the following changes:
'mauricerenck.indieConnector' => [
    'secret' => 'my-secret',
    'sqlitePath' => './content/.db/',
    'stats' => [
        'enabled' => true,
    ],

    'post' => [
        'prefereLanguage' => 'en',
        'allowedTemplates' => ['bookmark', 'note'],
        'textfields' => ['text'],
    ],

    'mastodon' => [
        'enabled' => true,
        'instance-url' => 'https://example.com',
        'bearer' => 'my_bearer',
    ],
],
First, we set a secret that is used in various places within the plugin to secure routes and webhooks.
We want to utilize the panel statistics and, if necessary, a few other functions that require a database. Therefore, we need to configure a path where the database can be stored.
Next, we configure the general settings to be able to post to Mastodon and other services. I set the preferred language to English because I write in both German and English, and although German is the default language in Kirby, I post in English.
As described above, I have two templates for my notes, but only these two templates should trigger a post to Mastodon. Therefore, I set allowedTemplates to these two template names. Finally, I tell the plugin in which field my text is stored. In our example, text.
Let's, configure Mastodon quickly. To do this, we set the instance and an API token, which can be created at https://example.com/settings/applications. The new app requires at least the following scopes:
- read
- write:media
- write:statuses
The generated token should be stored somewhere safe.
Starting now, the IndieConnector plugin will create a Mastodon post whenever we publish a new note in Kirby.
Raycast Plugin
Raycast extensions are written in TypeScript and use React for UI components. The extension we will be writing consists of a mix. We need a form where we can enter the text, and obviously, we must send this data to Kirby.
I won't explain here how to create a new extension, that can be found here and is relatively easy. I assume that a dummy plugin already exists. I am also publishing my code on GitHub, so you can use it.
Once we start the development with npm run dev, the new plugin appears in Raycast and can be tested.
We’ll begin with the simple part, the form. We’ll create a new command if it hasn’t already been done, and output the form:
export default function Command() {
return (
    <Form
      actions={
        <ActionPanel>
          <Action.SubmitForm onSubmit={handleSubmit} />
        </ActionPanel>
      }
    >
      <Form.TextArea id="posttext" title="Post Text" placeholder="Enter your text" enableMarkdown={true} />
      <Form.TextField id="url" title="Bookmark" placeholder="https://" value={url} onChange={setUrl} />
      <Form.TextField id="title" title="Titel" placeholder="Titel" />
      <Form.Separator />
      <Form.Checkbox id="autopublish" title="Autopublish" label="Autopublish" defaultValue={preferences.autopublish} />
      <Form.Checkbox id="skipUrl" title="Skip URL" label="Skip URL" defaultValue={preferences.skipurl} />
      <Form.Checkbox id="externalPost" title="External Post" label="External Post" defaultValue={preferences.posse} />
    </Form>
  );
}
This creates a Form like the one in the screenshot. I’ll explain where the defaultValues come from shortly. In the form, you can see that handleSubmit() is called when submitting. This is where the actual API call takes place:
  async function handleSubmit(values: Values) {
    try {
      const baseUrlNoTrailingSlash = preferences.baseurl.replace(/\/$/, "");
      const response = await fetch(`${baseUrlNoTrailingSlash}/posse`, {
        method: "POST",
        headers: {
          "Content-Type": "application/json",
          Authorization: `Bearer ${preferences.secret}`,
        },
        body: JSON.stringify(values),
      });

      if (!response.ok) {
        throw new Error(`HTTP error! status: ${response.status}`);
      }

      const responseData = (await response.json()) as ApiResponse;
      await Clipboard.copy(responseData.url);

      const status = responseData.status == "draft" ? "Posted as draft" : "Published your post";

      showToast({ title: status, message: "The URL has been copied to your clipboard" });
      await delay(1000);
      await closeMainWindow();
    } catch (error) {
      console.error(error);
      showToast({ style: Toast.Style.Failure, title: "Error", message: "Failed to submit form" });
    }
  }
We call the API with fetch, accessing two values that can later be set in the extension settings: the base URL and a secret. This way we avoid hardcoding private data in the source code.
We are making a POST call and directly inserting the values we receive from the form.
If something goes wrong, we generate an error in the catch block, that will cause a message under the form.
Everything is running smoothly, we read the response from the API, which will contain a URL that we immediately copy into the clipboard, inform the user about it, and then close the window after one second.
I’ve added a small bonus that occurs when calling the extension in the form of a hook.
  const [url, setUrl] = useState("");

  // Read clipboard when the form is opened
  useEffect(() => {
    async function fetchClipboard() {
      const text = await Clipboard.readText();

      if (text) {
        if (text.startsWith("http")) {
          setUrl(text);
        }
      }
    }

    fetchClipboard();
  }, []);
As soon as the form appears, I read the clipboard and check if it contains a link. If it does, I set the local state url. A look at the form's code shows that this URL is then set as the value for the bookmark field. Because I often copy a URL in the browser to share it directly, this small refinement saves me a few keyboard shortcuts.
React Hooks
React Hooks are called in certain situations. In this case, the hook is called when rendering the form and the contained code is executed.
React States
A React state is always defined with a variable name and a setter. The variable will only be updated through the setter in the future. Whenever the variable is used, an automatic update/render is triggered when its value changes.
That’s how we could actually work now, but we’re still missing all the values from the settings, i.e. everything stored under preferences. Here is the appropriate type for better clarity:
interface Preferences {
  secret: string;
  baseurl: string;
  autopublish: boolean;
  posse: boolean;
  skipurl: boolean;
}
Before we do anything else in the command, we get the settings:
  const preferences = getPreferenceValues<Preferences>();
  const markdown = "You need to provide a secret in the extension preferences.";
  if (!preferences.secret) {
    return (
      <Detail
        markdown={markdown}
        actions={
          <ActionPanel>
            <Action title="Open Extension Preferences" onAction={openExtensionPreferences} />
          </ActionPanel>
        }
      />
    );
  }
Settings
Settings can be stored on two levels, we'll use both:
- Global for all Commands
- For a specific Command
The preferences are defined in the package.json.
baseUrl and secret will be stored globally. We may add more API calls later, so we’ll need them there as well. All other settings are only needed in the form and will therefore only be stored for the command.
At the highest level of the package.json file, we add a new entry and define the values:
  "preferences": [
    {
      "name": "secret",
      "title": "Secret key",
      "description": "Enter your API token",
      "type": "password",
      "required": true
    },
    {
      "name": "baseurl",
      "title": "Base URL",
      "description": "Enter your API endpoint",
      "type": "textfield",
      "required": true
    }
  ],
When we first activate the extension, we must first enter values for these global settings. This will make sure they are set when we use the command.
Now we define settings that apply to our command and are not useful for possible other commands:
"commands": [
    {
      "name": "new-note",
      "title": "New Note",
      "description": "Creates a new note",
      "mode": "view",
      "preferences": [
        {
          "name": "autopublish",
          "title": "Autopublish",
          "description": "Automatically publish the note",
          "type": "checkbox",
          "default": false
        },
        {
          "name": "skipurl",
          "title": "Skip URL",
          "description": "Skip URL",
          "type": "checkbox",
          "default": true
        },
        {
          "name": "posse",
          "title": "POSSE",
          "description": "Post to other platforms",
          "type": "checkbox",
          "default": true
        }
      ]
    }
],
This time we're not quite as strict. All settings have a default value, so they don't have to be forced to be configured. We use these settings for the three checkboxes in the form. So, for example, I don't have to click to automatically publish my post every time.
We already access the values with defaultValue={preferences.posse} in the form.
Once you finish npm run dev, the plugin will be available to you in Raycast like other plugins.
That means we’re ready to go. However, we still need the receiving side in the form of a Kirby route.
The Kirby Route
We have several ways to set up the Kirby route:
- Directly in the config.php
- As a plugin
Since the code is identical, I’m leaving this decision up to you. I have a plugin that collects these special routes so that my config.php stays clean. However, the code is the same in both cases.
'routes' => [
    [
        'pattern' => 'posse',
        'method' => 'POST',
        'action' => function () {
            // FOLLOWING CODE
        }
    ]
]
The route should be called under /posse as a POST request. Before we do anything, we check if the token is correct. We retrieve the data from the request, which is sent via the POST request. We do this using the Kirby Request methods1. There, we check if an Authorization Header with our token is present:
$request = kirby()->request();
$requestData = $request->data();

$authHeader = $request->header('Authorization');
$token = $authHeader ? explode(' ', $authHeader)[1] : null;

if ($token !== option('mauricerenck.posse.token', '')) {
    return new Response('Unauthorized', 'text/plain', 401);
}
In the config.php file, we now need to set our token. If the token from the URL does not match, we immediately terminate and provide a corresponding feedback. To be completely sure, we set the default value of the token to an empty string. If the token matches, the script continues to run.
To create a new note, we first need a page to do so on. In my case, there is the notes page, which is further divided by years. We attempt to retrieve this page, and if it is not found, we immediately stop.
$year = date('Y');
$parent = kirby()->page('notes/' . $year);

if (is_null($parent)) {
    return new Response('Not Found', 'text/plain', 404);
}
Now we can be sure that all requirements are met.
In the next step, we will take the submitted values and set necessary variables, also catching any potentially missing values:
$template = 'note';
$autoPublish = isset($requestData['autopublish']) && filter_var($requestData['autopublish'], FILTER_VALIDATE_BOOLEAN);

$newData = [
    'title' => empty($requestData['title']) ? 'Bookmark ' . date('Y-m-d') : trim($requestData['title']),
    'text' => !empty($requestData['posttext']) ? trim($requestData['posttext']) : '',
    'icSkipUrl' => isset($requestData['skipUrl']) && filter_var($requestData['skipUrl'], FILTER_VALIDATE_BOOLEAN),
    'enableExternalPosting' => isset($requestData['externalPost']) && filter_var($requestData['externalPost'], FILTER_VALIDATE_BOOLEAN)
];
In my example, we distinguish between two templates, a simple text note note and a bookmark bookmark. First, we set the standard template note.
We receive all data as a string, including Boolean values. With $autoPublish = isset($requestData['autopublish']) && filter_var($requestData['autopublish'], FILTER_VALIDATE_BOOLEAN); we can safely convert the value into a true Boolean variable. We do this for all suitable values.
Our Kirby page needs a title. If no title is entered in Raycast, we will use a generated title.
The actual text will usually be present, but we still ensure that at least an empty text is provided.
We also set two values of the IndieConnector, namely whether the URL should be attached to the Mastodon post and whether we want to post to Mastodon (or Bluesky) at all.
Then we check if a valid URL was submitted. If so, I differentiate here between a plain text note and a bookmark. This is reflected in the title, the link, and the template.
if (!empty($url) && V::url($url)) {
    $newData['title'] = 'Link: ' . $newData['title'];
    $newData['link'] = $url;
    $template = 'bookmark';
}
Before we create the page, we need to ensure one thing: we must avoid duplicates. When we create a note titled test and doing this a second time, Kirby will throw an error, which prevents the second page from being created because it would overwrite the first one. We need to handle this.
$slug = Str::slug($newData['title']);
$unusedSlug = false;
while ($unusedSlug === false) {
    $unusedSlug = is_null($parent->childrenAndDrafts()->find($slug));
    if (!$unusedSlug) {
        $slug = $slug . '-' . uniqid();
    }
}
We generate the slug for the new page, which will correspond to the folder name. Then we loop through a list of all child pages and check if a page with that slug already exists. If it does, we add an ID to our slug. In the second loop iteration, we should no longer find any page, and we’ll be on the safe side. If, unexpectedly, the new slug also exists, the loop continues until no page is found.
Now we can finally create the new page. To do this, we need the appropriate permissions which we obtain using impersonate():
kirby()->impersonate('kirby');
$newPage = Page::create([
    'parent'  => $parent,
    'slug'     => $slug,
    'template' => $template,
    'content' => $newData
]);
Initially, new pages are always a draft. If we told at Raycast that the page should be published immediately, we now need to do that:
if ($autoPublish === true) {
    $newPage->changeStatus('listed');
}
We are almost finished. We want to tell Raycast the result:
$response = [
    'url' => $newPage->url(),
    'status' => $setToPublished ? 'published' : 'draft',
];

return new Response(json_encode($response), 'application/json', 201);
In Raycast, this response shows a success or error message. And the URL is copied to the clipboard so we can open the note.
Refinements
We can now quickly create new notes and publish them directly as Mastodon or Bluesky posts, and this with a manageable codebase.
Those who wish can now continue to refine the flow. We could, for example, retrieve answers from Bluesky back into the notes. I will soon publish a post about this, as the IndieConnector can do so.
You can find the complete Kirby route code here:
You can find the Raycast plugin source code here:
Have fun posting!
I decided against officially publishing both plugins because customization can be very individual on the Kirby side. However, if there is a need, please write me a comment!