Using Signal to create notes
In this article, we will write a script that allows us to create a note in Kirby using the Signal messenger.
This is an experiment. Everything I describe in this article should be taken with a grain of salt and understood as a proof of concept.
In this post I already explained how we can create and publish a new note using Kirby and Raycast. We'll now use this code as a basis and take it to the next level.
The goal of our experiment: We want to send ourselves a message in Signal, and this message should be posted online as a note on the Kirby blog. To do this, we'll use the POSSE endpoint described above.
Signal CLI
In order to capture messages and do something with them, we need some kind of access. The Signal CLI project helps us here, as it thankfully offers a wrapper that provides us with a REST API.
Once launched, we can register this tool as a new device in our account. Therefore, here's the warning again: This is an experiment! If configured incorrectly, this setup could, in the worst case, give potential attackers access to all your messages!
We'll run Signal CLI in a Docker container. To achieve this, we'll create a docker-compose.yaml:
services:
  signal:
    image: bbernhard/signal-cli-rest-api:latest
    container_name: signal-api
    environment:
      - MODE=native #supported modes: json-rpc, native, normal
    ports:
      - "8080:8080" #map docker port 8080 to host port 8080.
    volumes:
      - "./signal-cli-config:/home/.local/share/signal-cli"
We'll use the Signal-CLI-Rest-Api Docker image as our basis. We don't have to do much besides configure a few basic settings. The volume is important; this is where metadata is stored, such as the account name. It's critical to keep this directory intact so we don't have to constantly add a new device.
We can test the setup with the following command:
docker-compose up
We can then access the following URL in the browser:
http://localhost:8080/v1/qrcodelink?device_name=signal-api
We now need to add our running CLI instance to the trusted devices. In the Signal app, we go to our avatar and then "Paired Devices" → "Add New Device." Once we've scanned the QR code in the browser, we're ready to go.
Signal CLI can now access all messages. But we can't do anything with that yet. We still need a link between Signal CLI and our POSSE endpoint. To do this, we'll write a small Typescript.
The Script
To do this, we create the directory bot and create a package.json there so that we have all the dependencies ready:
{
  "name": "signal-bot",
  "version": "1.0.0",
  "main": "dist/index.js",
  "scripts": {
    "build": "tsc",
    "start": "node dist/index.js"
  },
  "dependencies": {
    "axios": "^1.6.0",
    "dotenv": "^16.3.1"
  },
  "devDependencies": {
    "typescript": "^5.4.0",
    "@types/node": "^22.0.0"
  }
}
As you can see, the scope is limited. In the next step, we create a tsconfig.json file.
{
  "compilerOptions": {
    "target": "ES2020",
    "module": "commonjs",
    "outDir": "./dist",
    "strict": true,
    "esModuleInterop": true,
    "types": ["node"]
  },
  "include": ["index.ts"]
}
First, we'll start by reading the most important key data. We'll use environment variables.
import axios from "axios";

const SIGNAL_API = process.env.SIGNAL_API!;
const SIGNAL_NUMBER = process.env.SIGNAL_NUMBER!;
const TARGET_API = process.env.TARGET_API!;
const KIRBY_SECRET = process.env.KIRBY_SECRET!;
We need the API endpoint provided by our Docker container, our own phone number, the Kirby POSSE endpoint, and the Kirby secret.
async function poll() {
  try {
    const res = await axios.get(
      `${SIGNAL_API}/v1/receive/${encodeURIComponent(SIGNAL_NUMBER)}`,
    );
    const messages = res.data;

    for (const msg of messages) {
      const sender = msg.envelope?.source;
      const destination =
        msg.envelope?.syncMessage?.sentMessage?.destinationNumber;
      const text =
        msg.envelope?.dataMessage?.message ||
        msg.envelope?.syncMessage?.sentMessage?.message;

      if (sender === SIGNAL_NUMBER && destination === SIGNAL_NUMBER && text) {
        console.log(`Forwarding message: ${text}`);
      }
    }
  } catch (error) {
    if (error instanceof Error) {
      console.error("Error polling messages:", error.message);
    } else {
      console.error("Unknown error:", error);
    }
  }
}
We start by calling the Signal endpoint. It returns a list of unread messages, which we then iterate through. We need some data to retrieve:
- The sender of the message
- The recipient of the message
- The body of the message
There's a small peculiarity with the body of the message. Since we'll be sending the text to ourselves (note to self), this text will immediately be marked as read, and we'll no longer find the text under envelope?.dataMessage?.message as it would normally, but under envelope?.syncMessage?.sentMessage?.message. To be absolutely sure, we query both values. If the first is empty, we fall back to the sent data.
Since we respond to every message, and thus every message in every chat would create a note in Kirby, we first need to filter the matching messages:
if (sender === SIGNAL_NUMBER && destination === SIGNAL_NUMBER && text)
This query ensures that we only respond to messages sent from our own number to our own number that contain a text. This gives us some protection.
Now we fill in the if block. We want to send the API request to Kirby in it:
let skipUrl = false;
let ext = false;
let autopublish = true;

// Find and remove hashtags, set flags
let parsedText = text
  .replace(/#skipUrl\b/gi, (_match: any) => {
    skipUrl = true;
    return "";
  })
  .replace(/#ext\b/gi, (_match: any) => {
    ext = true;
    return "";
  })
  .replace(/#draft\b/gi, (_match: any) => {
    autopublish = false;
    return "";
  })
  .trim();

await axios.post(
  TARGET_API,
  {
    posttext: parsedText,
    externalPost: ext,
    skipUrl,
    autopublish,
  },
  {
    headers: {
      "Content-Type": "application/json",
      Authorization: `Bearer ${KIRBY_SECRET}`,
    },
  },
);
First, we set a few default values. We defined them in the POSSE post mentioned above. They allow us to control Kirby.
skipUrldetermines whether a link to the note should be attached when posting to Mastodon.extdetermines whether to post to Mastodon or Bluesky at all.autopublishdetermines whether the note should be published immediately or saved as a draft.
Since we don't have suitable buttons in the Signal chat, we use hashtags: #skipUrl, #ext, and #draft.
We search for these hashtags in the text, ignoring case, and set the corresponding variables. Finally, we remove the hashtags from the text so they no longer appear in the note.
I have autopublishing enabled and deactivate it specifically with the hashtag #draft. This can, of course, be reversed if necessary.
Finally, we send the API request to Kirby. As you can see, it contains all the necessary fields and our secret in the header.
We're almost done. We just need to call our method regularly to check for new messages:
setInterval(poll, 10_000);
Docker Compose
Before we finish, we need to adjust our docker-compose.yml. We want to run our bot together with Signal CLI. To do this, our bot first needs a Dockerfile:
FROM node:22-alpine

WORKDIR /app
COPY . .
RUN npm install
RUN npm run build

CMD ["node", "dist/index.js"]
We'll use the node-alpine image as a base, install all the necessary packages, build our script, and run it.
There's certainly room to optimize and save space here, but it's fine for our experiment.
Now we need to extend our docker-compose.yml. Below the existing signal code, we'll add:
services:
    signal:
        # see code above
    bot:
        build: ./bot
        container_name: signal-bot
        environment:
          - SIGNAL_API=http://signal:8080
          - SIGNAL_NUMBER=+491234567890
          - TARGET_API=https://my-blog.tld/posse
          - KIRBY_SECRET=abc-def-ghi
        depends_on:
          - signal
        restart: unless-stopped
Here we set our environment variables. We use the container name for the Signal endpoint. We also need to specify our phone number with the country code and, of course, our Kirby POSSE endpoint and secret.
Our bot waits for the Signal CLI to be available before booting.
To build our bot, we need to call this command whenever we make code changes:
docker compose up --build
After that, it is enough to call docker-compose:
docker-compose up
If the containers should run in the background, we can simply add -d:
docker-compose up -d
Done!
Now we can send a message to ourselves:
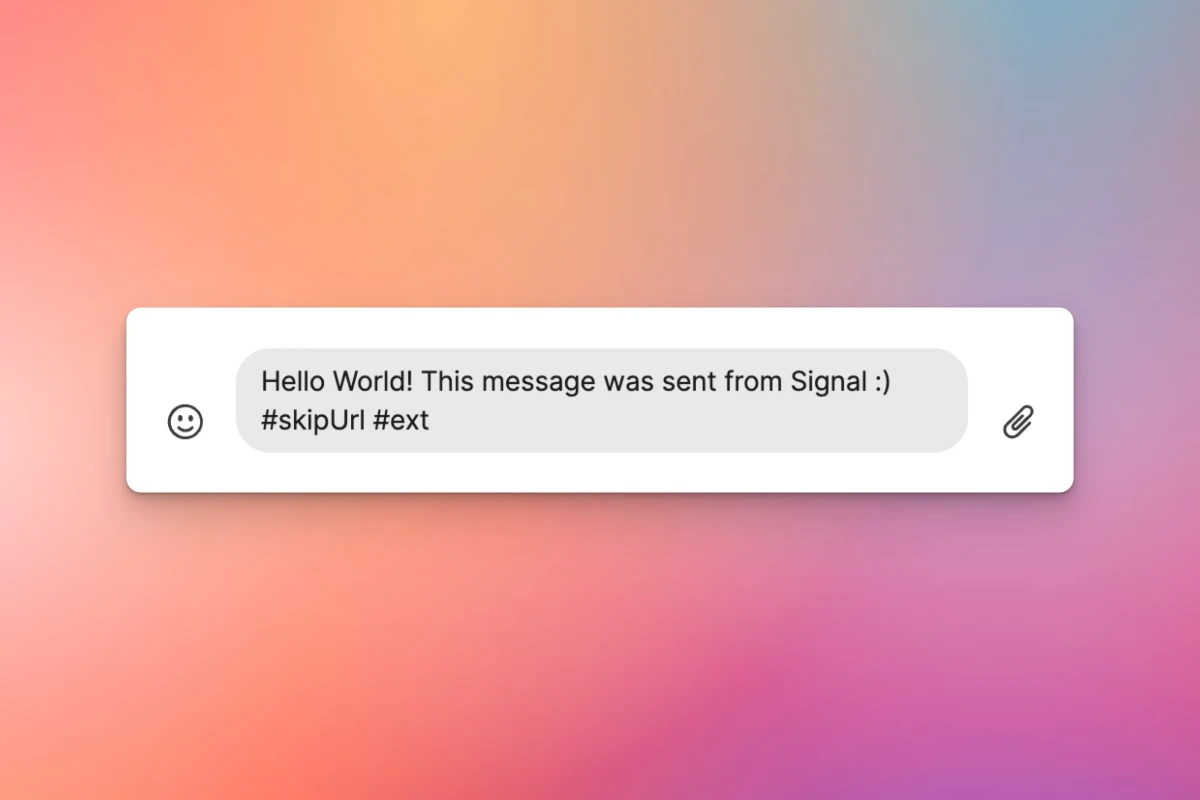
Our script picks up this message:
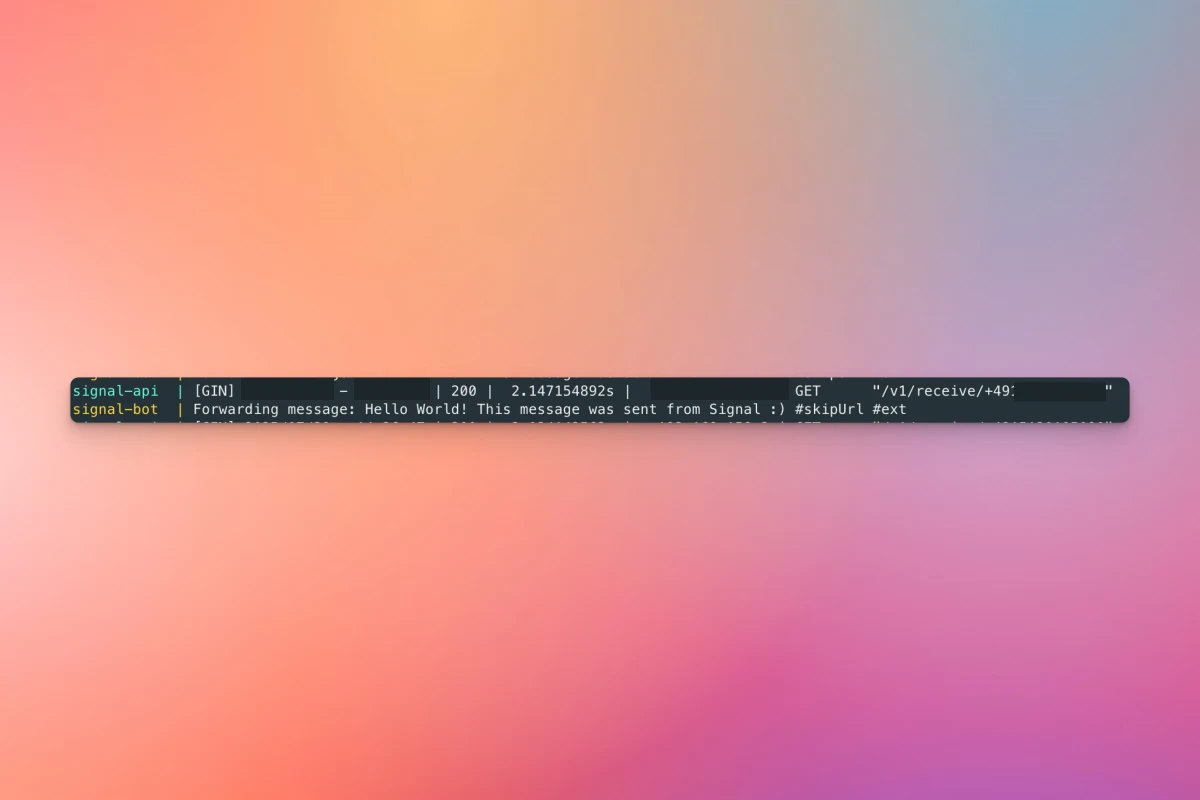
Sends it to Kirby and publishes the note:
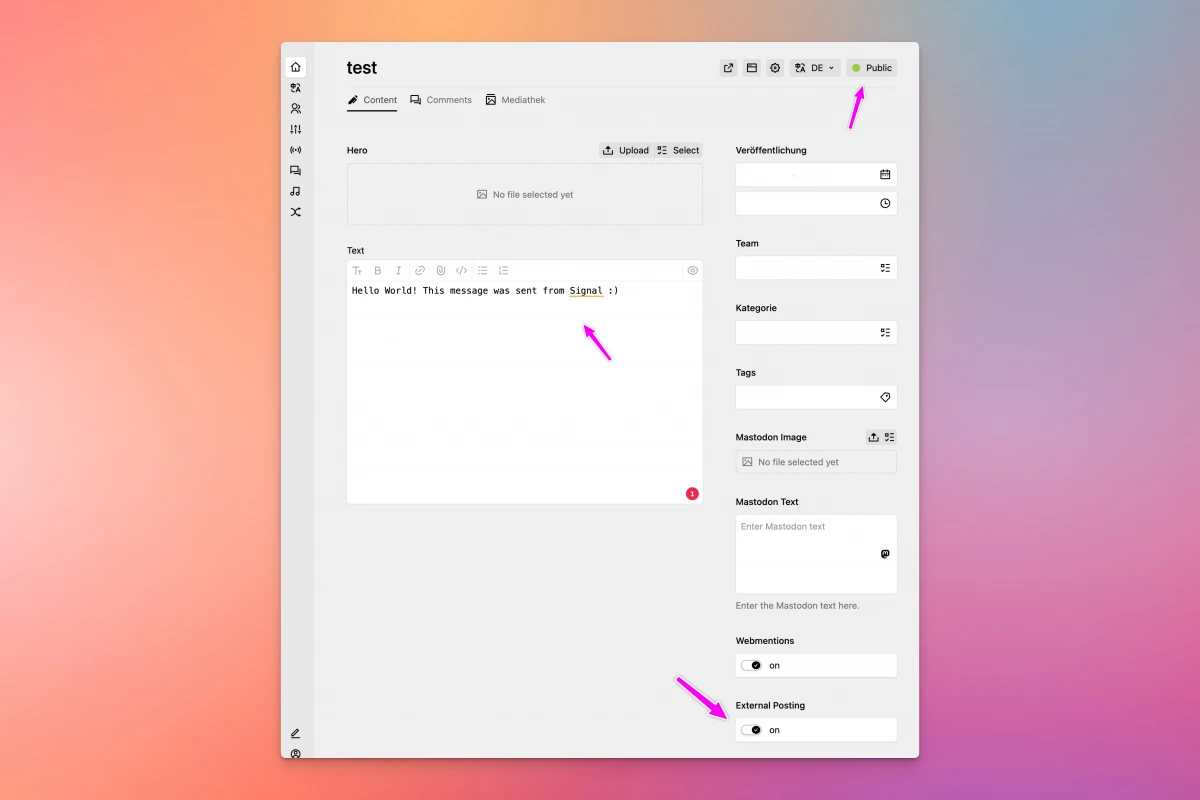
And the IndieConnector plugin forwards it to Mastodon because we've enabled external posting:
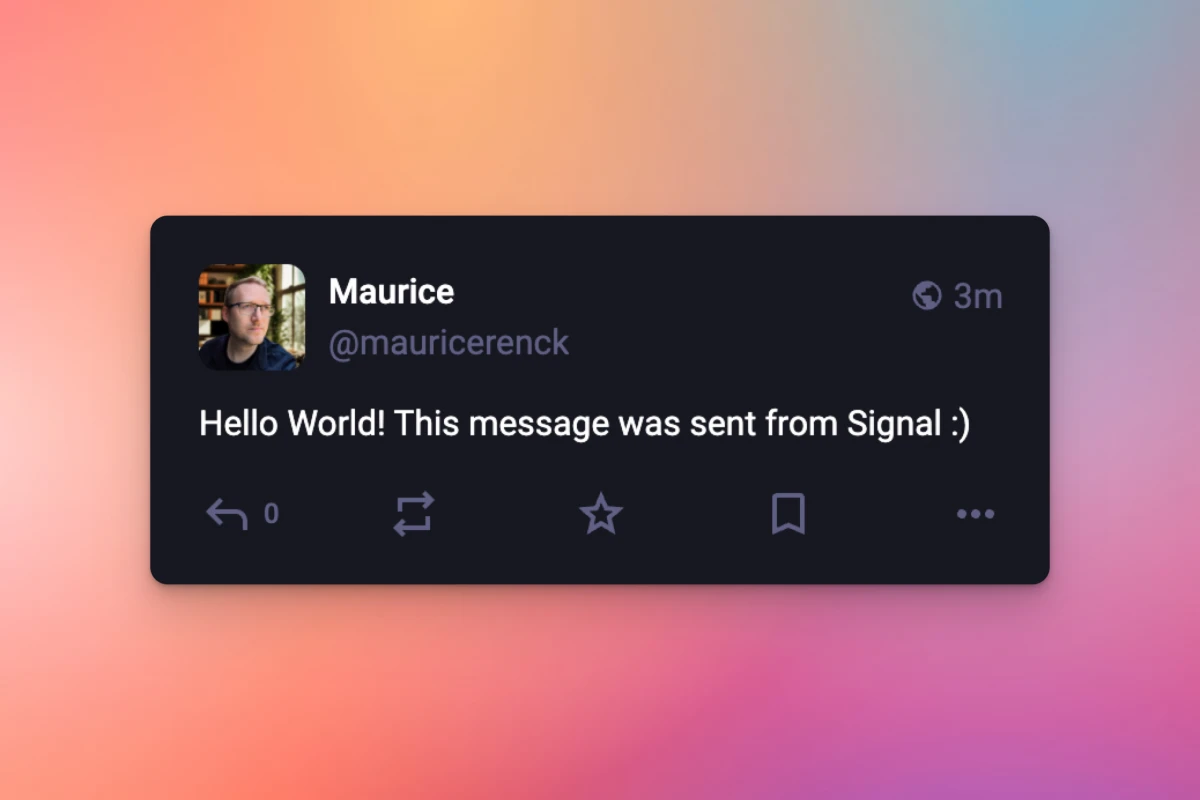
Now we can post to our notes from our phone, Twitter-style, and share them as we please.
Finally, it should be noted that all messages we send to ourselves will be published. Anyone using Signal's Note to Me feature for other purposes should expand the logic a bit and add another hashtag for posting. This way, #posse could trigger the process and ignore all other messages. Perhaps a good idea to avoid accidental notes.
It should be mentioned again that this is an experiment intended to demonstrate what we can do with our blogs. Anyone who wants to run the script in this format should be aware of the security risks associated with running Signal CLI, especially if the API endpoint is made publicly available.
Nevertheless: Have fun trying it out!