Automatic social media images
This way we can automatically generate post images for sharing on twitter and other platforms.
Update: I put my current plugin online here: https://github.com/mauricerenck/og-image it can be used as a Kirby plugin but I wont't maintain it and you have to adapt the code to your needs. Maybe this becomes an official plugin at some point, right now there is no time for that.
Whenever we share blogposts on twitter or other platforms, those links draw more attention if they come with an image. This is possible by using a twitter card or opengraph tags. Those are meta tags, which can be enriched with information like title, description and an image.
In my CMSI do have two fields for those meta tags. I can add some text and also upload an image. The problem is, I don't have images for each post and I don't like to search for generic StockImages for every single post. That's why I stole an idea from GitHub (and other ideas): I generate my own images!
I like how GitHub does this. This is how it looks for one of my repositories:

Those image are generated automatically, that's what I want to achive.
For that I created a Affinity Designer Template. That's not needed but that way I do have some more creative possibilities. What app you use for that doesn't matter, as long as you get a PNG out of it. This is how it looks like:

Creating images with PHP
Let's get started. The image has to be filled with information. I want the title and a description to be displayed. I use Kirby as CMS and wrote a plugin for that. This way I do have everything in one place.
The first step is to create an image in PHP
$canvas = imagecreatetruecolor(1200, 600);Our template image will be used a base, so let's load it and copy it into the newly generated image:
$background = imagecreatefrompng(__DIR__ . '/assets/background.png');

imagecopyresampled(
    $canvas,
    $background,
    0,
    0,
    0,
    0,
    imagesx($background),
    imagesy($background),
    imagesx($background),
    imagesy($background)
);
Now we will add the page title to the image. For that we use the imagettftext() function. We need a font to do so, let's load it:
$fontRegular = __DIR__ . '/assets/GangsterGrotesk-Regular.ttf';
$fontBold = __DIR__ . '/assets/GangsterGrotesk-Bold.ttf';
Depending on where the font is located you may want to change the path accordingly. I am loading two fonts, a regular one for the description and a bold one for the headline. Let's add the headline to the image:
[$titleX, $titleY] = imagettftext(
  $canvas,
  58,
  0,
  $margin,
  120,
  $black,
  $fontBold,
  $text
);
We're creating a text here and put it on our image ($canvas). The font size is 58 and there is a margin. Is use the variable $margin which is currently set to 60. The top margin is 120 I only use it once, so I don't store it in a variable. The headline should be black, for that I defined a color:
$black = imagecolorallocate($canvas, 0, 0, 0);I use the bold font and hand in the text, which is stored in the $text variable. This is how it looks:

This looks okay. Unfortunately we do have a invisible problem, have a look:

If the title is too long, it flows out of the image. So have to define boundaries. That's not as easy as in an image editor. What we can do, is to add a line break every n characters. After how many characters is dependent of the font and font size. There is no general formular, we have to try. Those values are fitting for me:
$text = wordwrap($text, 30, "\n");There will be a line break after 30 characters. This is how it looks like:

Better. The width of the text is save now. But it could flow out of the bottom of the image. We'l ignore that, the title shouldn't be so long.
Now we want to show the description. The font size should be a bit smaller, I also want it to be colored (purple), so I define another color and print out the text like this:
$purple = imagecolorallocate($canvas, 139, 126, 164);
$text = wordwrap($text, 48, "\n");

imagettftext(
    $canvas,
    24,
    0,
    $margin,
    $titleY + 70,
    $purple,
    $fontRegular,
    $text
);
Because the text is smaller the line breaks will be added after 48 chars. We use the regular font and a size of 24. Have a look at $titleY + 70. It's not possible to position text relatively, so we have to do some calcuations the prevent the description and title to overlap. To do so we use the return value of the title $titleY. And we add 70 pixels to that value, which will be the y position of the description. This way they will never overlap.

But there is still a problem with long titles. If the title occupies to much space, there won't be enough space left for the description. Have a look:

In this case, I decided not to show the description. A title that long has to be enough then. So we only show the description if the y position is lower than a certain value. Again, there is no formular for this, try it out by your own:
if ($titleY <= 315) {
    $text = wordwrap($text, 48, "\n");

    imagettftext(
        $canvas,
        24,
        0,
        $margin,
        $titleY + 70,
        $purple,
        $fontRegular,
        $text
    );
}
Okay, seems to work…
The last thing I want to do, is to add the url to the bottom of the image. Again we use a text for that, colored white:
imagettftext(
    $canvas,
    24,
    0,
    120,
    570,
    $white,
    $fontRegular,
    $url
);
Cool, that's fine for me! But some remarks:
Because my CMS does a lot of work for me, I didn't go into detail on some points. The description for example can be very long, too. So I tell Kirby to trim it:
$description = $page->intro()->excerpt(200);Kirby will trim the text after 200 chars and add a …. This could also be done directly with PHP by using substr:
$description = substr($description, 0, 200) . '…';Again: Numbers depend on the font size.
We also somehow have to add the image to the page. We use meta tags for that:
<meta property="og:image" content="https://maurice-renck.de/de/your-website/automatische-beitragsbilder-im-blog/og-image">

<meta name="twitter:image" content="https://maurice-renck.de/de/your-website/automatische-beitragsbilder-im-blog/og-image">
I use two variants for that, the opengraph solution and the twitter card. Both have to be added in between <head></head>.
Kirby also comes with routing. Which means my plugin automatically generates the image, whenever /og-image is added to the page url. This way I don't have to do anything.
For my site I added the possibility to manually add an image in the Kirby Panel:
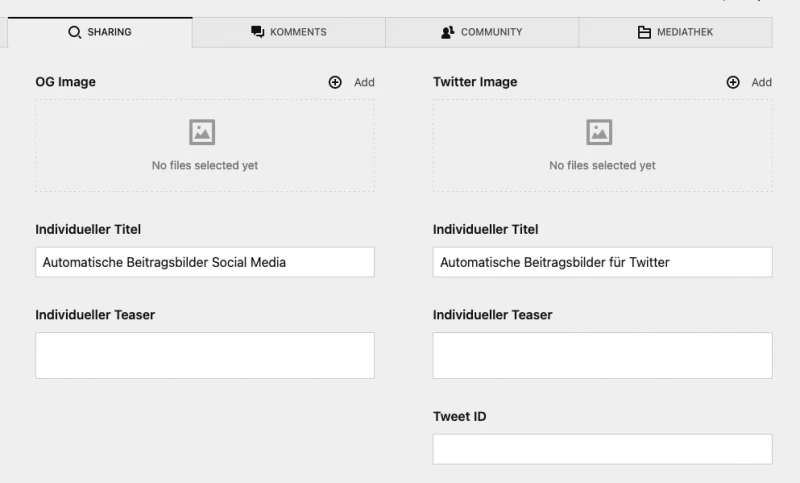
Whenever an image is set here, this one will be used, not the generated one. I can also set a special title and description.
I am quite happy with that solution. Maybe this is helpful for you, too.
Do you have a question or some feedback? Please write a comment.
Replies
Write a comment